Talismans-Talismans-Talismans!
Experience the Power!

Lesson IV

Magick of the Future:
The Basic Course
Rune Magick Courses 

The JU 99 CE with Transfer Couple
The JU 99 CE is a bare-bones Welz Chi Generator (orgone generator) for individual use that fits every budget. This extraordinary device contains all the essential parts of the larger Welz Chi Generators. Its excellent qualities make it a powerful utensil for all whose budget does not allow them yet to acquire a larger, stronger, and more versatile Welz Chi Generator, but who are very serious about bringing the magic of success into their lives; and who are ready to work on decisive changes towards prosperity, satisfying relationships, self-confidence, peace of mind and happiness. Generating planetary energies is as easy as 1-2-3: Simply put the kamea (number square) of the planet next to the energy output pipe.
It's Here at Last !!!
Magickal Orgone Mind Machines for Fitness, Body Building and Sports! Supreme Skills, Power & Performance
Enhancement that
Defies Detection!

PR 2400 CD Power Radionics Program for PC - The ultimate Radionics Program!!!

Other Websites

Talisman Lesson IV

Copyright 1994 by Karl Hans Welz
This course may not be reproduced in whole or in part by any means without prior
permission in writing from the author.
Address queries to: HSCTI, Box 1298, Woodstock, GA 30188

e-mail: Karl@Welz.net

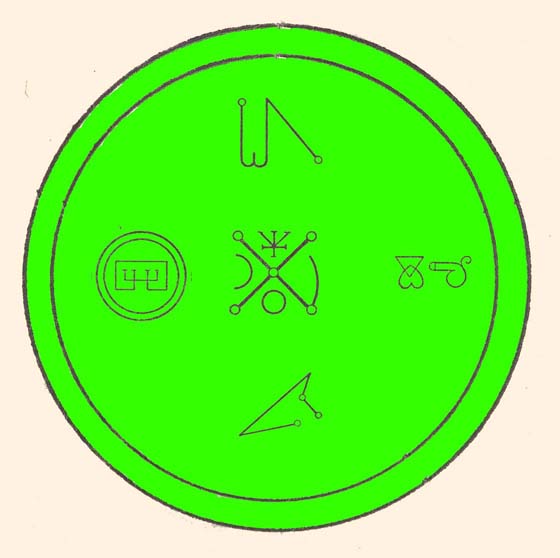
DESIGNING A PLANETARY TALISMAN

Now you are ready to design your planetary talisman. For this purpose, you take paper or, better, cardstock. The color of the cardboard or paper should ideally be the color of the planet. Or you may use white cardboard and draw with a pen that has the color of the planet. Ideally, the pen should be new.

What you are doing now is actually not making the talisman(s), which would require a ceremonial set up and some other observances. For now, you decide how to arrange the symbols of the talisman. In other words, you practice. In the following, I will give you the arrangements, front and back, of each planetary talisman. You are not required to follow exactly the same pattern, but as you progress in your skills, you will make the decision what symbols you chose and how they should be arranged on the talisman.

Typically, a planetary talisman has two sides. One side has the numeric square (magical square) of the planet, while the other side contains the various characters, seals, names, etc., of the planet.

Let's proceed step by step in a situation where you are asked to make a talisman. Let's now imagine that somebody comes to you who wants success in love. What planetary talisman would you make for that person: VENUS, of course. To make the talisman, you may wait for a FRIDAY, which is the day of VENUS, and you may even wait for the hour of Venus. But about timing later. For now it is important that you set yourself up to make the talisman. What metal would you choose - if you make a metal talisman? The metal of Venus is COPPER. This course will not teach you how to etch metal. If you do not know how to etch or if you have two left hands as far as skills in arts and crafts are concerned, you can make just as good a talisman on cardboard that you may laminate or, better, real parchment. Parchment has a unique color. Therefore you will decide for your pen to have the color of Venus, which is GREEN.

So what you need to get now is:
1. Parchment, or paper
2. a Green pen, and a compass or, better yet, a stencil for circles.
3. Some ceremonial utensils, at least a candle (see lesson 2 where you made the SATOR AREPO talisman)
4. You will use the SATOR AREPO talisman. Therefore, if you have not made this talisman yet, now it is time that you do so.
5. Some paper to DESIGN the talisman,
which is all you need immediately.

Once you have gathered all necessary materials, you can begin with the design. You begin with the side that contains the numbers.
1. First, you draw a CIRCLE on the paper. Trace it GREEN.
2. Inside the circle, you draw a square. The corners of the square may touch the periphery of the circle. The square is subdivided in 7 x 7 -49 little squares.
3. In the little squares, you draw the numbers of the square of Venus, from 1 through 49, as shown in lesson 2.
4. In the four segments that remain, you write the four numbers of Venus, 7 on top, 49 on the right, 175 to the left, and 1225 to the bottom.
5. Now, you turn the cardboard over.
6. You begin with drawing the concentric circles. With drawing two
7. On top, between the two circles, you draw the astrological symbol for Venus.
8. In the middle, you draw the character of Venus
9. On top, between character and the astrological symbol, you draw the symbol of the archangel.
10. To the right, you draw the symbol of the spirit, to the left, you draw the symbol of the intelligence of Venus.
11. At the bottom you draw the symbol of the demon of Venus. This far, all symbols are on the talisman, unless you want to arrange the talisman in such a way that you can also draw the seal of the planet. Now, you proceed to write down the names of the spirit, character, etc. in the space between the two circles.
12. You begin on top, on the right side of the astrological symbol for Venus. You write first BNE SERAPHIM (or BNE ELOHIM). Next, write the name of the Archangel, ANAEL, to the left of the Venus symbol. Following BNE ELOHIM, you inscribe the name of the spirit, HAGIEL. On the right of ANAEL, you write the name of the intelligence, HAGITH. Last, you write the name of the Demon, KEDEMEL, at the bottom, below its symbol. You may ask "why include the demon?" There is a simple reason for this. Including the symbol of the negative force of Venus, gives you control over it, so you can ward it off. You are prepared, so to say. The position of this symbol, at the bottom, symbolizes this control. You would not want this symbol at the top of the talisman. Such a position would give you control, too, but the effect of the talisman would then be of an undesirable disharmonic nature. What you have now, is a blueprint of the talisman you are going to make. How to make and charge a planetary talisman, you will find this in the fifth lesson of this mini course.